

Key Takeaways
Engine oil leaks can begin with a small seal failure and end with serious engine damage if the oil level falls too far. Careful observation, safe diagnosis, and timely repairs usually prevent a minor leak from becoming a major bill.
- Check the oil level as soon as you notice a spot, smell, or warning light.
- Gaskets, seals, filters, drain plugs, and oil pans are common leak sources.
- Oil usually travels downward, so the lowest wet point may not be the origin.
- A clean engine and UV dye can make a difficult leak easier to trace.
- Stop driving and arrange a tow when oil loss is severe or oil reaches hot parts.
Understanding engine oil leaks and why they matter
Engine oil leaks and solutions depend on identifying where oil escapes and why the sealing surface failed. Oil can seep slowly for months, or it can leave a visible trail within minutes. The first job is not guessing at a part but deciding whether the engine is losing oil externally, consuming it internally, or both.
A leak deserves attention even when the vehicle still drives normally. Oil protects moving components, carries heat away, and helps keep internal clearances working as designed. The common oil leak causes can look alike from the driveway, so a calm, methodical inspection is more useful than replacing the first part that looks damp.
What engine oil does inside the engine
Oil forms a lubricating film between moving components such as bearings, camshafts, pistons, and timing parts. It also helps carry heat and suspended contaminants toward the filter. The oil pump circulates it through passages, while gaskets and seals keep it inside the engine and related housings.
That system needs an adequate quantity and the correct pressure. A small amount of oil on the outside may not immediately change how the engine runs, but the lost oil still reduces the available reserve. Over time, contamination and heat can also make a seal less flexible, allowing seepage to increase.
How leaks differ from normal oil consumption
A leaking engine loses oil through an external path, while normal consumption sends a small amount through the combustion process or ventilation system. External oil may appear on the engine, subframe, splash shield, or pavement. Consumed oil can lower the dipstick reading without leaving a mark beneath the vehicle and may be accompanied by exhaust smoke.
The distinction matters because topping up the oil does not repair an external leak, and replacing a gasket will not necessarily stop oil that is being burned internally. Record the level over several checks, using the same parking surface and procedure. That simple pattern helps a technician decide whether to inspect the underside, the intake and exhaust system, or both.
Why even a small leak can become serious
A slow seep can worsen when a seal hardens, a fastener loosens, or crankcase pressure rises. Oil can also spread onto belts, wiring, rubber mounts, and other parts that were not designed to stay wet. If the level drops below what the pump can reliably supply, friction and heat rise quickly.
Early action limits damage because it preserves information about the leak and often keeps the repair smaller. Do not judge severity by the size of the driveway spot alone; a leak may collect inside a cover or on an undertray before it drips. The risks of ignoring leaks include both mechanical damage and unsafe conditions around the vehicle.
Common locations where oil collects under a car
Oil commonly gathers near the front or rear edge of the oil pan, below a valve cover, around the oil filter, or near the transmission bellhousing. Airflow can move oil rearward while driving, and a plastic splash shield can hold it for days. As a result, the location of a puddle often points to a general area rather than a precise failed component.
Look for the highest fresh wet point, not just the lowest stain. A flashlight, gloves, and a sheet of clean cardboard can reveal whether the liquid is fresh and where it first reaches the underside. Never crawl beneath a vehicle supported only by a jack.
Common engine oil leak causes
Most engine oil leak causes and solutions involve a sealing surface, a threaded service point, or pressure that forces oil past a component. Age, heat cycles, vibration, road debris, and incorrect service work can all contribute. Several faults may exist at once, especially on an older engine with a long maintenance history.
Start with the simplest recently serviced parts before assuming an internal seal has failed. A filter that is cross-threaded or a drain plug with a damaged washer can leak just as visibly as a worn gasket. This oil leak repair overview is useful background when several possible sources appear together.
Worn or damaged gaskets and seals
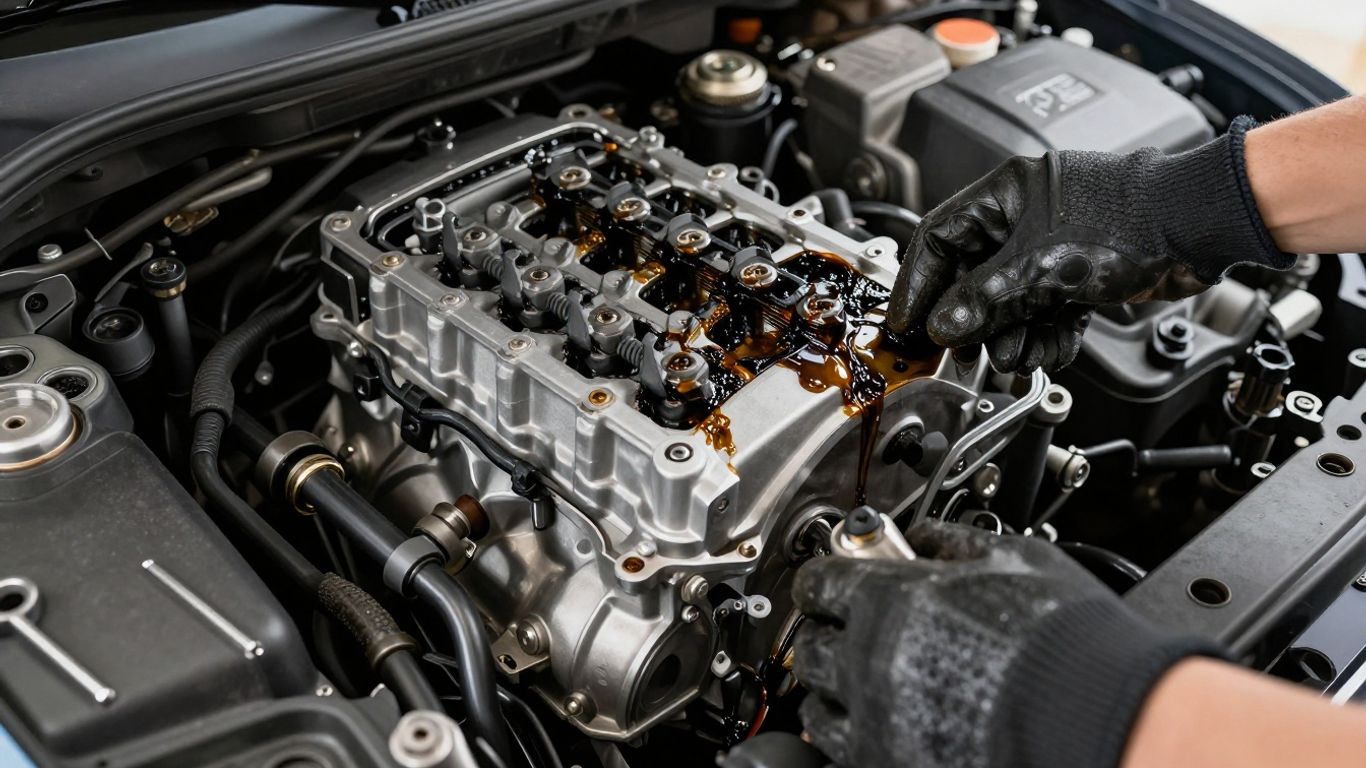
Gaskets fill the uneven space between bolted engine surfaces, while seals close rotating shafts and other moving interfaces. Heat and age can flatten, harden, crack, or distort these materials. Valve cover, timing cover, oil pan, crankshaft, and camshaft sealing areas are frequent places to inspect.
Oil from a valve cover may run down the side of the engine and imitate a lower leak. A shaft seal can spread oil behind a pulley or into a housing where it is difficult to see directly. The repair normally requires confirming the source first, because replacing a lower gasket will not stop oil originating above it.
Loose, damaged, or over-tightened drain plugs
The drain plug is removed and reinstalled during an oil change, making it a common source of fresh leakage after service. A missing or flattened washer, dirty mating surface, damaged threads, or insufficient tightening can allow oil to pass. Excessive tightening can be just as harmful by deforming the pan or damaging the threads.
Inspect the plug only after the engine and exhaust are cool. If the threads are compromised, forcing the plug tighter is not a repair. The correct fix may involve a new washer, replacement plug, thread repair, or an oil pan replacement, depending on the damage.
Cracked oil pans and engine components
The oil pan sits low and can be struck by road debris, a curb, or an incorrectly positioned jack. A dent may restrict oil pickup, while a crack can produce a steady leak. Cast or aluminum housings can also crack around mounting points when fasteners are overtightened or the component has suffered impact.
A pan may need replacement rather than patching if its sealing flange is bent or its threads are damaged. Wipe the area clean and inspect for a distinct fracture, fresh trail, or impact mark. Do not confuse road grime or old residue with an active crack.
Faulty oil filters and filter seals
A filter can leak when its gasket is pinched, installed dry and out of position, left behind during replacement, or tightened incorrectly. A loose filter may seep around its circumference, while a damaged filter housing or adapter seal can leak from a less obvious point. Fresh oil around the filter after service deserves particular attention.
Check that the filter matches the engine and that its sealing surface is clean. Never tighten a filter by striking it or use a tool unless the manufacturer specifies one. If the filter housing has a replaceable O-ring, its groove and installation position matter as much as the ring itself.
Excessive crankcase pressure
Combustion gases can pass the piston rings and enter the crankcase, while the ventilation system normally routes those gases away. If ventilation passages or a valve become blocked, pressure can push oil past otherwise serviceable gaskets and seals. The resulting oil may appear at several locations, which makes the leak seem larger or more mysterious than it is.
A technician may test the ventilation system and look for pressure-related symptoms rather than simply resealing every wet joint. Correcting the blockage can reduce future seepage, but it will not restore a gasket that has already been damaged. Avoid treating pressure symptoms as proof of one particular failed part.
Symptoms that help identify an oil leak
Symptoms rarely identify the exact component by themselves, but they help establish urgency and direction. Note when the smell occurs, whether the mark is new, and whether the oil level changes between checks. A short description and a photograph can save diagnostic time at a repair shop.
Some signs overlap with coolant, transmission fluid, power-steering fluid, or water from air conditioning. Color, texture, location, and smell provide clues, but they are not substitutes for a careful inspection. If you are comparing several possibilities, this engine leak symptom guide offers another general reference.
Oil spots and puddles under the vehicle
Fresh engine oil is often amber to brown, while older oil may look dark brown or nearly black. A spot beneath the front half of the vehicle suggests the engine or oil pan, but airflow and underbody panels can move the fluid. A stain with no visible drip may mean oil is collecting on a shield or evaporating from a warm surface.
Place clean cardboard under the parked vehicle overnight, then compare the position and appearance of any new mark. Do not rely only on color, since dirt changes the way fluids look. Touching an unknown fluid with bare hands is best avoided.
Burning oil smells and visible smoke
Oil dripping onto a hot exhaust manifold, catalytic converter, or other exhaust component can create a sharp burning smell. Light smoke from the engine bay may follow, especially after the vehicle warms up. Smoke from the tailpipe points toward a different kind of problem, such as oil entering the combustion chamber or exhaust stream.
Turn the engine off if smoke increases or the odor becomes strong. Open the hood only when it is safe and keep hands, clothing, and tools away from fans and belts. A smell that disappears after parking still warrants inspection because hot surfaces may simply be masking the leak until the next drive.
Low oil levels and dashboard warning lights
Check the dipstick on level ground after following the vehicle maker’s instructions for whether the engine should be warm or cool. A falling level confirms oil loss but does not reveal whether the cause is an external leak, consumption, or an incorrect previous fill. The oil-pressure warning light is more urgent than a routine maintenance reminder.
If the oil-pressure light comes on while driving, pull over safely and shut the engine down. Adding oil without investigating may allow a short trip, but it should not be used to justify continued driving when the level drops again. A warning light combined with a ticking or knocking sound calls for immediate caution.
Noisy engine operation or overheating
Low oil can increase friction and reduce the cushion between moving parts, producing ticking, tapping, rattling, or knocking sounds. Oil loss may also contribute to rising engine temperature, although overheating has many other causes. A new noise or temperature change makes a leak more than a cosmetic concern.
Stop in a safe place and let the engine cool before checking anything. Do not remove a pressurized coolant cap while hot, and do not assume adding oil will correct an overheating problem. Continued operation with abnormal noise can turn a repairable leak into internal engine damage.
Oil around the top or sides of the engine
Oil at the top edge of the engine often begins near a valve cover, filler cap, or another upper sealing surface. Oil around the side may have traveled from above, especially when the vehicle is moving. Fresh wetness is more useful than a broad coating of old residue.
Clean the area carefully, run the engine briefly, and watch from a safe distance for the first new trace. Avoid spraying water or cleaner into electrical connectors, ignition components, or open intake passages. If the source remains hidden, stop before dismantling parts that may create a second problem.
How to diagnose the source of an oil leak
Diagnosis works best as a sequence rather than a hunt for the dirtiest component. Confirm the fluid, establish the oil level, clean away old residue, and then observe where fresh oil begins. Good lighting and patience often reveal more than an immediate parts order.
Keep the vehicle supported securely and stay clear of hot, moving, and rotating components. If access requires removing shields or belts, use the service information for that vehicle. A professional inspection is sensible when the leak is near the timing system, bellhousing, or another area where a mistaken diagnosis is expensive.
Checking the oil level and leak color
Begin with the dipstick and note the level, oil appearance, and date. Engine oil usually feels slick and leaves a translucent brown or black mark, but contamination can alter both color and texture. Compare the suspected fluid with a drop from the dipstick rather than relying on memory.
A check beneath the vehicle can then establish whether the leak is active. Place absorbent paper below suspected areas, but do not use it near an exhaust that is still hot. These first observations create a baseline for the later cleaning and recheck.
Cleaning the engine before inspection
Old oil attracts dust and creates a broad, misleading trail. With the engine cool, clean accessible surfaces using a suitable degreaser and protect sensitive electrical parts from direct spray. Follow the product directions and dispose of oily towels responsibly.
Do not pressure-wash an engine casually. Water forced into connectors, sensors, bearings, or ignition components can create faults unrelated to the leak. After cleaning, allow the area to dry and inspect it under good light before running the engine.
Tracing oil from the highest wet point
Once the engine is clean, run it only long enough to reproduce the leak, if doing so is safe. Watch the upper surfaces first, then follow the fresh trail downward. Oil often travels along a flange or rib, so the first wet point is more informative than the bottom edge where it finally drips.
A compact inspection sequence keeps the process consistent:
- Confirm the fluid and check the oil level.
- Inspect recently serviced parts first.
- Clean the suspected area and dry it fully.
- Run the engine briefly while observing from a safe position.
This sequence reduces guesswork and helps distinguish a primary leak from oil that has simply migrated across the engine. If the trail appears only while driving, an underbody inspection may still be necessary after a short, cautious test.
Using UV dye and a leak detection light
When oil remains difficult to trace, a compatible UV dye can be added according to the vehicle and dye manufacturer’s instructions. After the engine circulates the dye, a UV light may reveal a bright trail that ordinary lighting misses. The procedure is especially helpful when several surfaces are close together or an undertray hides the first drip.
Use only a dye intended for the relevant lubricant system and avoid overfilling the engine while adding it. Clean surrounding residue first so old contamination does not confuse the result. Dye identifies the path of the fluid; it does not by itself prove which component should be replaced.
When professional diagnostic equipment is needed
Professional help is appropriate when the leak is rapid, inaccessible, mixed with another fluid, or located near a rotating belt or hot exhaust. A shop may use a lift, inspection camera, pressure testing, UV equipment, or manufacturer-specific service information. Those tools are valuable when a repair requires removing major components.
A technician should also be involved when the oil level falls quickly or the engine has warning lights, unusual noise, or smoke. Explain what you observed and mention recent service. Clear symptoms help the diagnostic process begin with evidence rather than assumptions.
Engine oil leak solutions and repair options
The correct repair depends on the failed part and the condition of the surfaces around it. Cleaning alone can remove evidence without stopping the leak, while indiscriminate tightening can damage a pan, cover, or threaded hole. A repair should restore the seal and address any underlying pressure or alignment issue.
Before work begins, confirm the correct gasket, seal, fastener procedure, and fluid specification for the vehicle. Some repairs are straightforward with normal tools; others require draining oil, supporting the engine, or removing timing components. If the repair exposes internal engine parts, professional service is usually the safer choice.
Replacing gaskets, seals, and O-rings
A gasket or seal replacement starts with removing the component without damaging its mating surfaces. The old material must be removed carefully, and the surfaces should be clean, flat, and dry where required. A new seal installed crooked, dry when it should be lubricated, or in the wrong orientation may leak immediately.
Use sealant only where the service procedure calls for it. Too much can squeeze into oil passages or separate inside the engine. After reassembly, tighten fasteners in the specified pattern and recheck for fresh oil after the engine reaches operating temperature.
Repairing or replacing the oil pan
A lightly damaged pan may sometimes be repaired if the sealing flange and threads remain sound, but a crack, severe dent, or distorted flange often calls for replacement. The vehicle must be supported securely, and the old gasket material must not be scraped into the pan or pickup area. The surrounding mounting surface deserves as much attention as the pan itself.
After installation, refill with the correct amount of oil and inspect for seepage. Do not judge the repair while the underside is covered in old residue. A clean, dry surface makes the final check meaningful.
Installing a new drain plug or oil filter
A new drain plug, sealing washer, or oil filter can resolve a leak caused by routine service damage. Verify that the replacement part matches the application and that no old filter gasket remains stuck to the housing. Cross-threading a plug or filter during installation can create a larger repair than the original leak.
Follow the specified hand-tightening or torque procedure rather than relying on feel alone. Start the engine briefly, shut it off, wait as directed, and inspect the service point. Recheck the oil level after the oil has settled.
Cleaning blocked crankcase ventilation components
If crankcase pressure is pushing oil past seals, the ventilation valve, hoses, and passages need inspection. A blocked hose may be restricted by sludge, collapse, or incorrect routing. Replacing a component without checking the whole path can leave the pressure problem in place.
Clean or replace parts only as the vehicle’s service procedure allows. Once ventilation is restored, inspect previously wet areas again because pressure may have damaged a gasket already. A continuing leak after ventilation service does not necessarily mean the cleaning failed; it may reveal a separate sealing repair that is still needed.
Using stop-leak products safely and cautiously
Stop-leak additives are sometimes marketed for minor seepage, but they are not a universal substitute for diagnosis or mechanical repair. They may alter seal material or circulate through passages, and a product that seems to slow one leak may create complications elsewhere. Treat any additive as a vehicle-specific decision, not a first response.
Read the label and manufacturer guidance before adding anything to the crankcase. Never use an additive to postpone action when oil pressure is low, oil is reaching the exhaust, or the leak is active. Finding and repairing the failed component remains the more dependable solution.
When an oil leak requires immediate attention
Some leaks can be monitored briefly while a repair is arranged; others make driving unsafe. The difference is usually the rate of oil loss, the presence of warning signs, and the location of the oil. When in doubt, protect the engine and people nearby rather than trying to complete the trip.
Pull over safely, switch off the engine, and assess the situation from outside the vehicle. Avoid standing in traffic or reaching beneath a hot car. The most common leak repairs can wait for a controlled inspection, but severe symptoms should not wait at all.
Situations that make driving unsafe
Do not continue driving when oil is pouring out, the oil-pressure warning remains illuminated, or the dipstick shows little or no oil. Smoke, a strong burning odor, fluid on a tire, or oil spreading across the road adds another safety concern. A leak near a belt can also cause belt failure or throw oil into the engine bay.
If the vehicle is in a dangerous location, call roadside assistance and follow local safety procedures. Do not place yourself beneath the vehicle to confirm the source. A small delay is preferable to losing lubrication or control in traffic.
Signs of severe oil loss or engine damage
Knocking, loud ticking, loss of power, stalling, or a sudden rise in temperature may indicate that the engine has been operating with inadequate lubrication or has suffered related damage. A rapidly falling dipstick level is equally concerning. These signs call for shutting the engine down as soon as it is safe.
Do not restart repeatedly to see whether the noise goes away. Each restart can increase damage if oil pressure is not being maintained. Record the warning lights and sounds for the technician, then arrange professional recovery.
What to do if oil reaches hot exhaust parts
Oil on hot exhaust components can smoke and, in unusual circumstances, ignite. Turn the engine off, move away from visible smoke, and keep combustible materials clear. Do not pour water onto a hot engine or exhaust system, since sudden cooling can damage components and steam can cause burns.
If flames appear, call emergency services and use an appropriate extinguisher only if you are trained and can do so without risk. Even when smoke stops, the source still needs repair and the affected areas need cleaning. Do not resume driving simply because the smell has faded.
When towing is safer than driving to a repair shop
Towing is the safer option when the leak is active, the oil-pressure light is on, the engine is noisy, or the oil level cannot be maintained. It is also sensible when the source is close to a moving belt or when smoke is coming from the engine bay. A tow avoids turning a seal repair into an engine replacement.
Tell the repair shop what happened and whether you added oil. If possible, photograph the warning light, puddle, or smoke without putting yourself in danger. Those details help the shop prepare for inspection before the vehicle arrives.
Preventing future engine oil leaks
Prevention is mostly careful routine service and early observation. Seals still age, and road damage can still happen, but correct fluids, clean mating surfaces, and proper torque reduce avoidable failures. A few minutes of checking can also reveal a seep before it becomes a drip.
Use the vehicle’s maintenance schedule as the starting point, then account for severe service such as towing, dusty roads, repeated short trips, or extreme temperatures. Keep the maintenance inspection routine idea in mind: regular, gentle checks are more useful than aggressive cleaning after a problem appears.
Following the correct oil and filter change schedule
Fresh oil and a properly installed filter support the engine’s lubrication system and provide regular opportunities to inspect the drain plug, filter seal, and surrounding surfaces. Follow the interval in the owner’s manual rather than choosing one based only on mileage. Time matters too when a vehicle is driven infrequently.
After service, check for drips while the engine is running and again after the vehicle has been parked. Confirm the oil level using the prescribed procedure. Keep the old filter and used oil out of household drains, and recycle or dispose of them through an approved program.
Using the manufacturer-recommended oil grade
Oil viscosity and performance specifications are selected for the engine’s clearances, temperature range, and emissions equipment. The correct grade may reduce stress on seals and support proper flow during startup. Consult the owner’s manual or an authorized service source rather than guessing from the weather alone.
Avoid mixing products casually when a top-up is needed. If the wrong oil has been installed, ask a qualified technician whether it should be changed promptly. Oil choice will not repair a torn gasket, but the wrong specification can complicate lubrication and diagnosis.
Tightening service parts to the correct torque
Drain plugs, filter housings, valve covers, and oil pans need the specified tightening method. Too little force can allow movement and seepage; too much can warp a flange, crush a gasket, or strip threads. A torque wrench is useful when the service procedure provides a value.
Replace single-use washers or fasteners when required. Tighten in the stated sequence, especially on covers with several bolts. Good installation technique prevents many leaks that might otherwise be mistaken for age-related seal failure.
Inspecting seals, hoses, and the underside regularly
Look for fresh wetness, cracked rubber, loose hoses, damaged splash shields, and impact marks during routine checks. An underside inspection is easier after washing away road salt and grime, but the vehicle must be safely supported. Pay attention to changes rather than trying to make every surface perfectly spotless.
A simple recurring check can cover these areas:
- The dipstick level and oil appearance.
- The filter, drain plug, and oil pan edge.
- The valve cover and upper engine surfaces.
- The ground or cardboard beneath the parked vehicle.
The value comes from repeating the same observations over time. A small change is easier to recognize when there is a clean baseline and a dated record.
Keeping maintenance and repair records
Write down the date, mileage, oil grade, filter part, and work performed. Add photographs of unusual seepage and note whether the vehicle was parked on an incline. These details can connect a new leak with recent service or show that a long-standing seep is changing.
Records also help a technician avoid duplicated tests and identify recurring failures. They are especially helpful when several shops or drivers use the same vehicle. Clear history turns a vague complaint into a useful diagnostic starting point.
Conclusion
Engine oil leak causes and solutions are easier to manage when the leak is treated as a traceable mechanical problem rather than a stain to cover. Check the level, identify the highest fresh point, repair the failed component, and stop driving when warning signs suggest serious oil loss. Consistent service and simple inspections can keep a small seep from becoming an expensive engine failure.
Frequently Asked Questions
How can I tell whether the liquid under my car is engine oil?
Engine oil is usually slick and ranges from amber to dark brown or black. Compare the fluid’s texture and color with the oil on the dipstick, while remembering that dirt and age can change its appearance. When uncertain, have the fluid identified professionally.
Is a small engine oil leak safe to drive with?
It may be possible to drive a short distance if the leak is slow, the oil level is correct, and there are no warning lights, smoke, unusual noises, or overheating. Check the level first and monitor it closely. Arrange a repair rather than treating continued topping-up as a solution.
Why does oil appear far from the actual leak?
Airflow, gravity, engine vibration, and underbody panels can carry oil away from its source. The lowest wet point may therefore be only where the oil finally drips. Cleaning the area and tracing the highest fresh wet point usually gives a better diagnosis.
Can an oil filter cause an engine oil leak?
Yes. A damaged, misplaced, double-installed, loose, or over-tightened filter seal can allow oil to escape. The filter and housing should be inspected first when leakage begins after an oil change, with attention to the mating surface and correct installation procedure.
Will stop-leak additive permanently fix an oil leak?
Stop-leak products may not address the failed part and can create compatibility or flow concerns. They should be considered only after checking the product guidance and the vehicle requirements. A confirmed mechanical failure is generally best handled by replacing or repairing the affected component.
Should I check the oil when the engine is hot or cold?
Use the procedure in the owner’s manual, because recommendations vary by vehicle. Park on level ground and allow the oil to settle for the specified time before reading the dipstick. Consistency matters when tracking a gradual loss.
When should an oil leak be diagnosed by a professional?
Seek professional diagnosis when the leak is rapid, difficult to access, near belts or hot exhaust parts, or accompanied by a warning light, smoke, overheating, or abnormal engine noise. A shop can safely lift the vehicle and use cleaning, lighting, dye, or other diagnostic methods to locate the source.